AutoMM 用于扫描文档分类
![]()

组织中的纸质文档是重要的信息来源,无论行业如何。处理纸质文档令人头疼,因为它们会占用大量空间,容易随着时间磨损或褪色,并且难以追踪。因此,通过扫描仪、相机等方式将纸质文档数字化的趋势日益增长。然而,数字化并不一定带来自动化,识别、分类和分析数字文档仍然是一个劳动密集型的过程。例如,将数字书籍分类到不同的类型,以及将扫描收据分类到水电费、交通费、保险费、租金、供应品等,如果手动完成,既耗时又繁琐。随着新的 AI 技术发展,自动化数字文档处理变得更容易、更有效。可以公平地说,AI 已成为现代数字文档处理系统的基石。
在本教程中,我们将展示如何使用 AutoGluon 多模态构建一个扫描文档分类器,只需几行代码。让我们开始吧!
获取文档数据集
现在,让我们下载一个扫描文档数据集。此数据集是 RVL-CDIP 的样本,该数据集最初包含 16 个类别的 400,000 张灰度图像,每个类别有 25,000 张图像。在这里,我们抽取了大约 100 份文档以及三种类别的文档,包括预算(标记为 0)、电子邮件(标记为 1)和表格(标记为 2)。
import warnings
warnings.filterwarnings('ignore')

import os
import pandas as pd
from autogluon.core.utils.loaders import load_zip

download_dir = './ag_automm_tutorial_doc_classifier'
zip_file = "https://automl-mm-bench.s3.amazonaws.com/doc_classification/rvl_cdip_sample.zip"
load_zip.unzip(zip_file, unzip_dir=download_dir)
Downloading ./ag_automm_tutorial_doc_classifier/file.zip from https://automl-mm-bench.s3.amazonaws.com/doc_classification/rvl_cdip_sample.zip...
  0%|          | 0.00/7.95M [00:00<?, ?iB/s]
100%|██████████| 7.95M/7.95M [00:00<00:00, 116MiB/s]
我们在下面加载训练和测试数据。
dataset_path = os.path.join(download_dir, "rvl_cdip_sample")
rvl_cdip_data = pd.read_csv(f"{dataset_path}/rvl_cdip_train_data.csv")
train_data = rvl_cdip_data.sample(frac=0.8, random_state=200)
test_data = rvl_cdip_data.drop(train_data.index)
我们需要展开文档路径以在训练中加载它们。
from autogluon.multimodal.utils.misc import path_expander

DOC_PATH_COL = "doc_path"

train_data[DOC_PATH_COL] = train_data[DOC_PATH_COL].apply(lambda ele: path_expander(ele, base_folder=download_dir))
test_data[DOC_PATH_COL] = test_data[DOC_PATH_COL].apply(lambda ele: path_expander(ele, base_folder=download_dir))
print(test_data.head())
                                             doc_path  label
1   /home/ci/autogluon/docs/tutorials/multimodal/d...      0
6   /home/ci/autogluon/docs/tutorials/multimodal/d...      0
7   /home/ci/autogluon/docs/tutorials/multimodal/d...      0
11  /home/ci/autogluon/docs/tutorials/multimodal/d...      0
14  /home/ci/autogluon/docs/tutorials/multimodal/d...      0
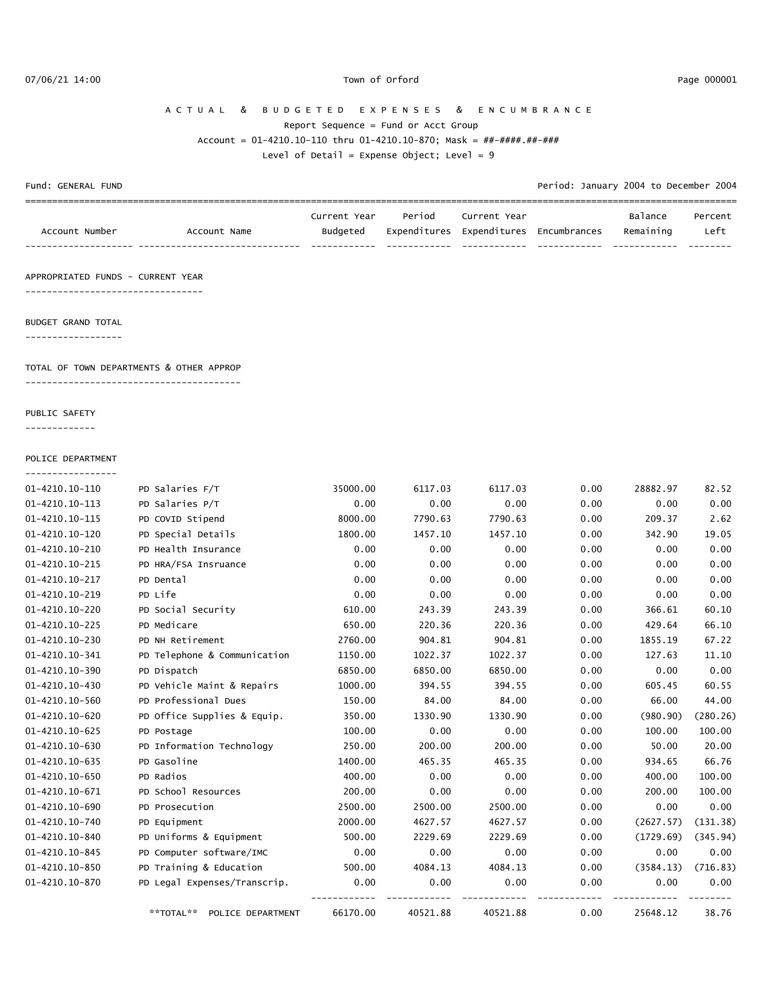
让我们展示其中一份文档。如您所见,这是一份预算文档,包含账号、账户名称、预算资金、支出等信息。
from IPython.display import Image, display

example_image = train_data.iloc[0][DOC_PATH_COL]
pil_img = Image(filename=example_image, width=500)
display(pil_img)
使用 AutoMM 构建扫描文档分类器
您可以使用我们的 MultiModalPredictor 构建扫描文档分类器。您只需创建一个预测器并使用上述训练数据集对其进行拟合。在底层,AutoMM 会自动识别手写或打字文本,并利用识别到的文本、布局信息以及视觉特征进行文档分类。模型自定义也非常简单,您可以使用 model.document_transformer.checkpoint_name 超参数指定底层基础模型,AutoMM 支持文档基础模型,如 layoutlmv3、layoutlmv2、layoutlm-base、layoutxlm 等,以及纯文本模型,如 bert、deberta 等等。
在这里,label 是包含要预测的目标变量的列名,例如,在我们的示例中它是“label”。为了演示目的,我们将训练时间限制设置为 120 秒。
from autogluon.multimodal import MultiModalPredictor

predictor = MultiModalPredictor(label="label")
predictor.fit(
    train_data=train_data,
    hyperparameters={"model.document_transformer.checkpoint_name":"microsoft/layoutlm-base-uncased",
    "optim.top_k_average_method":"best",
    },
    time_limit=120,
)
No path specified. Models will be saved in: "AutogluonModels/ag-20250508_205654"
=================== System Info ===================
AutoGluon Version:  1.3.1b20250508
Python Version:     3.11.9
Operating System:   Linux
Platform Machine:   x86_64
Platform Version:   #1 SMP Wed Mar 12 14:53:59 UTC 2025
CPU Count:          8
Pytorch Version:    2.6.0+cu124
CUDA Version:       12.4
Memory Avail:       28.41 GB / 30.95 GB (91.8%)
Disk Space Avail:   185.29 GB / 255.99 GB (72.4%)
===================================================
AutoGluon infers your prediction problem is: 'multiclass' (because dtype of label-column == int, but few unique label-values observed).
	3 unique label values:  [np.int64(0), np.int64(1), np.int64(2)]
	If 'multiclass' is not the correct problem_type, please manually specify the problem_type parameter during Predictor init (You may specify problem_type as one of: ['binary', 'multiclass', 'regression', 'quantile'])

AutoMM starts to create your model. ✨✨✨

To track the learning progress, you can open a terminal and launch Tensorboard:
    ```shell
    # Assume you have installed tensorboard
    tensorboard --logdir /home/ci/autogluon/docs/tutorials/multimodal/document_prediction/AutogluonModels/ag-20250508_205654
    ```
INFO: Seed set to 0
The model does not support using an image size that is different from the default size. Provided image size=224. Default size=None. Detailed model configuration=LayoutLMConfig {
  "_name_or_path": "microsoft/layoutlm-base-uncased",
  "attention_probs_dropout_prob": 0.1,
  "hidden_act": "gelu",
  "hidden_dropout_prob": 0.1,
  "hidden_size": 768,
  "initializer_range": 0.02,
  "intermediate_size": 3072,
  "layer_norm_eps": 1e-12,
  "max_2d_position_embeddings": 1024,
  "max_position_embeddings": 512,
  "model_type": "layoutlm",
  "num_attention_heads": 12,
  "num_hidden_layers": 12,
  "output_past": true,
  "pad_token_id": 0,
  "position_embedding_type": "absolute",
  "transformers_version": "4.49.0",
  "type_vocab_size": 2,
  "use_cache": true,
  "vocab_size": 30522
}
. We have ignored the provided image size.
GPU Count: 1
GPU Count to be Used: 1
INFO: Using 16bit Automatic Mixed Precision (AMP)
INFO: GPU available: True (cuda), used: True
INFO: TPU available: False, using: 0 TPU cores
INFO: HPU available: False, using: 0 HPUs
INFO: LOCAL_RANK: 0 - CUDA_VISIBLE_DEVICES: [0]
INFO:
  | Name              | Type                | Params | Mode
------------------------------------------------------------------
0 | model             | DocumentTransformer | 112 M  | train
1 | validation_metric | MulticlassAccuracy  | 0      | train
2 | loss_func         | CrossEntropyLoss    | 0      | train
------------------------------------------------------------------
112 M     Trainable params
0         Non-trainable params
112 M     Total params
450.521   Total estimated model params size (MB)
236       Modules in train mode
0         Modules in eval mode
INFO: Epoch 0, global step 1: 'val_accuracy' reached 0.43750 (best 0.43750), saving model to '/home/ci/autogluon/docs/tutorials/multimodal/document_prediction/AutogluonModels/ag-20250508_205654/epoch=0-step=1.ckpt' as top 3
INFO: Epoch 1, global step 2: 'val_accuracy' reached 0.68750 (best 0.68750), saving model to '/home/ci/autogluon/docs/tutorials/multimodal/document_prediction/AutogluonModels/ag-20250508_205654/epoch=1-step=2.ckpt' as top 3
INFO: Epoch 2, global step 3: 'val_accuracy' reached 0.87500 (best 0.87500), saving model to '/home/ci/autogluon/docs/tutorials/multimodal/document_prediction/AutogluonModels/ag-20250508_205654/epoch=2-step=3.ckpt' as top 3
INFO: Epoch 3, global step 4: 'val_accuracy' reached 1.00000 (best 1.00000), saving model to '/home/ci/autogluon/docs/tutorials/multimodal/document_prediction/AutogluonModels/ag-20250508_205654/epoch=3-step=4.ckpt' as top 3
AutoMM has created your model. 🎉🎉🎉

To load the model, use the code below:
    ```python
    from autogluon.multimodal import MultiModalPredictor
    predictor = MultiModalPredictor.load("/home/ci/autogluon/docs/tutorials/multimodal/document_prediction/AutogluonModels/ag-20250508_205654")
    ```

If you are not satisfied with the model, try to increase the training time,
adjust the hyperparameters (https://autogluon.cn/stable/tutorials/multimodal/advanced_topics/customization.html),
or post issues on GitHub (https://github.com/autogluon/autogluon/issues).
<autogluon.multimodal.predictor.MultiModalPredictor at 0x7fba0b1f1b10>
在测试数据集上评估
您可以在测试数据集上评估分类器,以查看其性能如何
scores = predictor.evaluate(test_data, metrics=["accuracy"])
print('The test acc: %.3f' % scores["accuracy"])
The test acc: 1.000
INFO: Using default `ModelCheckpoint`. Consider installing `litmodels` package to enable `LitModelCheckpoint` for automatic upload to the Lightning model registry.
对新文档进行预测
给定一个示例文档,让我们首先将其可视化,
doc_path = test_data.iloc[1][DOC_PATH_COL]
from IPython.display import Image, display
pil_img = Image(filename=doc_path, width=500)
display(pil_img)
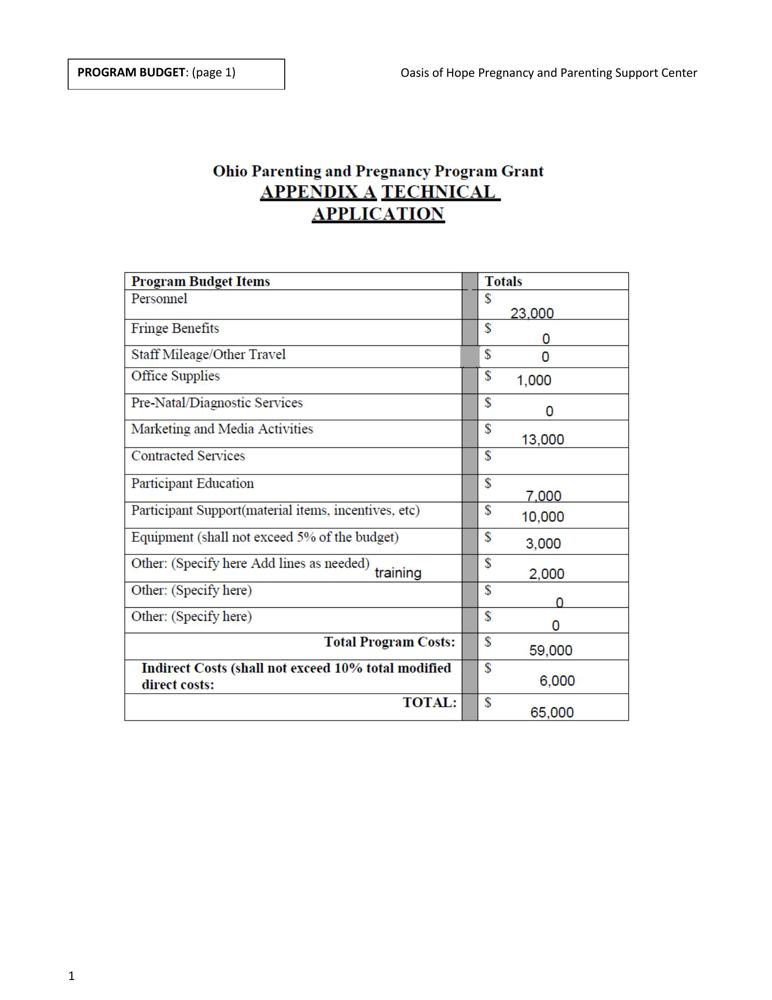
我们可以轻松地使用最终模型来预测标签,
predictions = predictor.predict({DOC_PATH_COL: [doc_path]})
print(predictions)
[0]
INFO: Using default `ModelCheckpoint`. Consider installing `litmodels` package to enable `LitModelCheckpoint` for automatic upload to the Lightning model registry.
上述输出表明,训练后的模型正确地将给定文档分类到预算类别。
如果需要所有类别的概率,您可以调用 predict_proba
proba = predictor.predict_proba({DOC_PATH_COL: [doc_path]})
print(proba)
[[0.9746097 0.01772033 0.00766995]]
INFO: Using default `ModelCheckpoint`. Consider installing `litmodels` package to enable `LitModelCheckpoint` for automatic upload to the Lightning model registry.
提取嵌入
提取模型学习到的整个文档的表示也非常有用。我们提供了 extract_embedding 函数,允许预测器返回 N 维文档特征,其中 N 取决于模型。
feature = predictor.extract_embedding({DOC_PATH_COL: [doc_path]})
print(feature[0].shape)
(768,)
INFO: Using default `ModelCheckpoint`. Consider installing `litmodels` package to enable `LitModelCheckpoint` for automatic upload to the Lightning model registry.
其他示例
您可以前往 AutoMM 示例 探索关于 AutoMM 的其他示例。
自定义
要了解如何自定义 AutoMM,请参阅 自定义 AutoMM。