使用 AutoGluon-Cloud 在 Amazon SageMaker 上训练和部署 AutoGluon 模型#
为了帮助进行 AutoGluon 模型训练,AWS 开发了一套训练和推理的深度学习容器。这些容器可用于使用 CPU 和 GPU 实例训练模型,并可以部署为 SageMaker 端点或用作批量转换作业。
我们提供 autogluon.cloud 模块,以利用这些容器和底层的 Amazon SageMaker,通过简单的 API 训练/部署基于 AutoGluon 的模型。
注意
云计算运行的费用由 Amazon SageMaker 管理,存储费用由 AWS S3 管理。AutoGluon-Cloud 只是这些服务的封装,不收取额外费用。虽然 AutoGluon-Cloud 努力简化这些服务的使用,但用户最终有责任监控其账户中的计算使用情况,以避免意外费用。
安装#
autogluon.cloud 不包含在默认的 autogluon 安装中。您可以通过以下方式安装它:
pip install autogluon.cloud
此外,请确保通过以下方式安装了最新版本的 sagemaker python API:
pip install -U sagemaker
这是必需的,以确保可以获取有关新发布的容器的信息。
准备具有必要权限的 IAM 角色#
目前,AutoGluon-Cloud 可以使用两种云后端:Amazon SageMaker 和 Ray (AWS)。以下是每种后端支持的功能概述。
功能 |
SageMaker |
Ray (AWS) |
|---|---|---|
支持的模态 |
|
|
训练(单实例) |
✅ |
✅ |
训练(分布式) |
❌ |
✅ |
推理端点 |
✅ |
❌ |
批量推理 |
✅ |
❌ |
AutoGluon-Cloud 需要与各种 AWS 资源交互。为此,我们建议设置一个具有必要权限的专用 IAM 角色。这可以通过以下选项之一完成。
从 AutoGluon-Cloud 仓库下载并查看 CloudFormation 模板
BACKEND="sagemaker"  # Supported options "sagemaker", "ray_aws"
wget https://raw.githubusercontent.com/autogluon/autogluon-cloud/refs/heads/master/cloudformation/ag_cloud_$BACKEND.yaml
注意
在应用之前,请务必查看 CloudFormation 模板中定义的 IAM 策略,并根据您的用例进行必要的更改。
部署 CloudFormation 堆栈
aws cloudformation create-stack \
    --stack-name ag-cloud \  # use your preferred stack name
    --template-body file://ag_cloud_$BACKEND.yaml \
    --capabilities CAPABILITY_NAMED_IAM  # give permission to create IAM roles
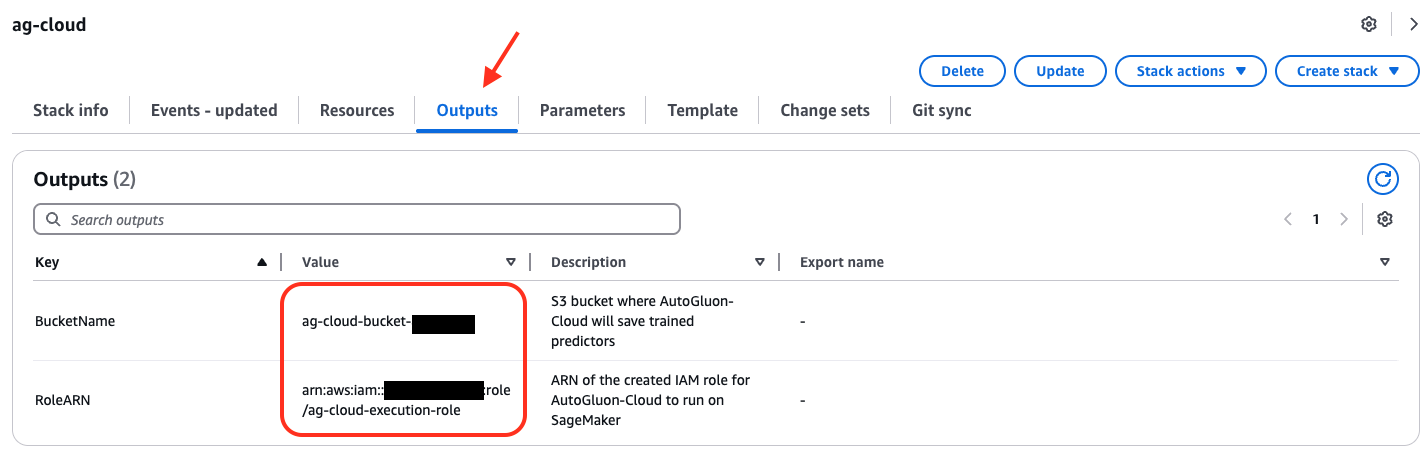
查看堆栈产生的输出
aws cloudformation describe-stacks --stack-name ag-cloud --query "Stacks[0].Outputs"
输出应该包含为 AutoGluon-Cloud 创建的 S3 存储桶名称和 IAM 角色 ARN。
[
    {
        "OutputKey": "BucketName",
        "OutputValue": "ag-cloud-bucket-abcd1234",
        "Description": "S3 bucket where AutoGluon-Cloud will save trained predictors"
    },
    {
        "OutputKey": "RoleARN",
        "OutputValue": "arn:aws:iam::222222222222:role/ag-cloud-execution-role",
        "Description": "ARN of the created IAM role for AutoGluon-Cloud to run on SageMaker"
    }
]
从 AutoGluon-Cloud 仓库下载并查看您选择的后端的 CloudFormation 模板
注意
在应用之前,请务必查看 CloudFormation 模板中定义的 IAM 策略,并根据您的用例进行必要的更改。
登录 AWS 控制台。确保选择您希望使用 AutoGluon-Cloud 的区域。
转到 CloudFormation > 堆栈 > 创建堆栈,并使用步骤 1 中下载的 CloudFormation 模板创建堆栈。
创建堆栈后,转到输出选项卡,查看为 AutoGluon-Cloud 创建的 S3 存储桶名称和 IAM 角色 ARN
创建一个 S3 存储桶,供 AutoGluon-Cloud 存储预测器。将
S3_BUCKET_NAME替换为您首选的存储桶名称。aws s3 mb s3://S3_BUCKET_NAME
通过以下命令使用我们的实用程序生成信任关系和 IAM 策略:
from autogluon.cloud import TabularCloudPredictor  # Can be other CloudPredictor as well

TabularCloudPredictor.generate_default_permission(
    backend="BACKEND_YOU_WANT",  # We currently support "sagemaker" and "ray_aws"
    account_id="YOUR_ACCOUNT_ID",  # The AWS account ID you plan to use for CloudPredictor.
    cloud_output_bucket="S3_BUCKET_NAME"  # S3 bucket name where intermediate artifacts will be uploaded and trained models should be saved. You need to create this bucket beforehand.
)
注意
请务必查看信任关系和 IAM 策略文件,并在应用之前根据您的用例进行必要的更改。
在接下来的步骤中,请务必将
AUTOGLUON-ROLE-NAME替换为您所需的角色名称,将AUTOGLUON-POLICY-NAME替换为您所需的策略名称,并将222222222222替换为您的 AWS 账号。创建 IAM 角色。
aws iam create-role --role-name AUTOGLUON-ROLE-NAME --assume-role-policy-document file://ag_cloud_sagemaker_trust_relationship.json
此方法将返回类似于
arn:aws:iam::222222222222:role/AUTOGLUON-ROLE-NAME的 角色 ARN。保留此 ARN 以供后续参考。创建 IAM 策略。
aws iam create-policy --policy-name AUTOGLUON-POLICY-NAME --policy-document file://ag_cloud_sagemaker_iam_policy.json
此方法将返回类似于
arn:aws:iam::222222222222:policy/AUTOGLUON-POLICY-NAME的 策略 ARN。保留此 ARN 以供后续参考。将 IAM 策略附加到角色。
aws iam attach-role-policy --role-name AUTOGLUON-ROLE-NAME --policy-arn "arn:aws:iam::222222222222:policy/AUTOGLUON-POLICY-NAME"
请务必记住
为 AutoGluon-Cloud 创建的 IAM 角色 ARN
AutoGluon-Cloud 将存储训练工件的 S3 存储桶名称
完成设置后,使用 AWS CLI 或 boto3 承担 IAM 角色。
import boto3

# Replace this with the ARN of your AutoGluon-Cloud IAM role
ROLE_ARN = "arn:aws:iam::222222222222:role/AUTOGLUON-ROLE-NAME"

session = boto3.Session()
credentials = session.client("sts").assume_role(
    RoleArn=ROLE_ARN,
    RoleSessionName="AutoGluonCloudSession"
)["Credentials"]

boto3.setup_default_session(
    aws_access_key_id=credentials["AccessKeyId"],
    aws_secret_access_key=credentials["SecretAccessKey"],
    aws_session_token=credentials["SessionToken"],
)
现在,当您在同一个 Python 脚本/Jupyter Notebook 中使用 autogluon.cloud 时,将使用正确的 IAM 角色。
请参阅本教程中的“承担 IAM 角色”部分。
有关设置 IAM 角色和策略的更多详细信息,请参阅此教程。
训练#
使用 autogluon.cloud 训练基于 AutoGluon 的模型很简单,与直接训练 AutoGluon 预测器没有太大区别。
目前,autogluon.cloud 支持训练/部署 tabular、multimodal 和 timeseries 预测器。在下面的示例中,我们使用 TabularCloudPredictor 进行演示。由于它们共享相同的 API,您可以轻松地将其替换为其他 CloudPredictors。
from autogluon.cloud import TabularCloudPredictor
train_data = "train.csv"  # can be a DataFrame as well
predictor_init_args = {"label": "label"}  # init args you would pass to AG TabularPredictor
predictor_fit_args = {"train_data": train_data, "time_limit": 120}  # fit args you would pass to AG TabularPredictor
cloud_predictor = TabularCloudPredictor(
    cloud_output_path="YOUR_S3_BUCKET_PATH"
).fit(
    predictor_init_args=predictor_init_args,
    predictor_fit_args=predictor_fit_args,
    instance_type="ml.m5.2xlarge",  # Check out supported instance and pricing here: https://aws.amazon.com/sagemaker/pricing/
    wait=True,  # Set this to False to make it an unblocking call and immediately return
)
重新连接到之前的训练作业#
如果您的本地连接由于某种原因中断(例如,断开了互联网连接),您的训练作业将仍然在 SageMaker 上运行,并且只要您知道作业名称,就可以使用另一个 CloudPredictor 重新连接到该作业。
训练作业开始时会记录下作业名称。它应该类似于:INFO:sagemaker:Creating training-job with name: ag-cloudpredictor-1673296750-47d7。或者,您可以前往 SageMaker 控制台查找正在进行的训练作业及其对应的作业名称。
another_cloud_predictor = TabularCloudPredictor()
another_cloud_predictor.attach_job(job_name="JOB_NAME")
重新连接的作业将不再提供训练作业日志的实时流。相反,日志将在训练作业完成后可用。
端点部署和实时预测#
如果您想将预测器部署为 SageMaker 端点,以便稍后进行实时推理,这只需要一行代码:
cloud_predictor.deploy(
    instance_type="ml.m5.2xlarge",  # Checkout supported instance and pricing here: https://aws.amazon.com/sagemaker/pricing/
    wait=True,  # Set this to False to make it an unblocking call and immediately return
)
可选地,您也可以附加到已部署的端点:
cloud_predictor.attach_endpoint(endpoint="ENDPOINT_NAME")
执行实时预测:
result = cloud_predictor.predict_real_time("test.csv") # can be a DataFrame as well
结果将是一个 pandas Series,类似于这样:
0      dog
1      cat
2      cat
Name: label, dtype: object
执行实时预测概率:
result = cloud_predictor.predict_proba_real_time("test.csv") # can be a DataFrame as well
结果将是一个 pandas DataFrame,类似于这样:
         dog       cat
0   0.682754  0.317246
1   0.195782  0.804218
2   0.372283  0.627717
请确保通过以下方式清理已部署的端点:
cloud_predictor.cleanup_deployment()
识别您是否附加了活动的端点:
cloud_predictor.info()
上述代码将返回一个字典,其中包含 CloudPredictor 的一般信息。其中一个键是 endpoint,如果有附加的端点,它将告诉您端点的名称,例如:
{
    ...
    'endpoint': 'ag-cloudpredictor-1668189208-d23b'
}
不使用 AutoGluon-Cloud 调用端点#
部署的端点是正常的 SageMaker 端点,您可以通过其他方法调用它。例如,直接使用 boto3 调用端点:
import boto3

client = boto3.client('sagemaker-runtime')
response = client.invoke_endpoint(
    EndpointName=ENDPOINT_NAME,
    ContentType='text/csv',
    Accept='application/json',
    Body=test_data.to_csv()
)

#: Print the model endpoint's output.
print(response['Body'].read().decode())
批量推理#
当最小化延迟不是主要考虑因素时,批量推理功能可能更简单、更具可伸缩性且成本更低,因为计算资源在批量推理作业完成后会自动终止。
一般指导原则是,如果您每小时需要获取预测结果少于一次,并且可以接受推理时间比实时推理长 10 分钟(由于计算资源启动开销),则使用批量推理。
执行批量推理:
result = cloud_predictor.predict(
    'test.csv',  # can be a DataFrame as well and the results will be stored in s3 bucket
    instance_type="ml.m5.2xlarge",  # Checkout supported instance and pricing here: https://aws.amazon.com/sagemaker/pricing/
    wait=True,  # Set this to False to make it an unblocking call and immediately return
    # If True, returns a Pandas Series object of predictions.
    # If False, returns nothing. You will have to download results separately via cloud_predictor.download_predict_results
    download=True,
    persist=True,  # If True and download=True, the results file will also be saved to local disk.
    save_path=None,  # Path to save the downloaded results. If None, CloudPredictor will create one with the batch inference job name.
)
结果将是一个 pandas DataFrame,类似于这样:
0      dog
1      cat
2      cat
Name: label, dtype: object
执行批量推理并获取预测概率:
result = cloud_predictor.predict_proba(
    'test.csv',  # can be a DataFrame as well and the results will be stored in s3 bucket
    include_predict=True,  # Will return a tuple (prediction, prediction probability). Set this to False to get prediction probability only.
    instance_type="ml.m5.2xlarge",  # Checkout supported instance and pricing here: https://aws.amazon.com/sagemaker/pricing/
    wait=True,  # Set this to False to make it an unblocking call and immediately return
    # If True, returns a Pandas Series object of predictions.
    # If False, returns nothing. You will have to download results separately via cloud_predictor.download_predict_results
    download=True,
    persist=True,  # If True and download=True, the results file will also be saved to local disk.
    save_path=None,  # Path to save the downloaded results. If None, CloudPredictor will create one with the batch inference job name.
)
如果 include_predict 为 True,结果将是一个包含预测和预测概率的元组,例如:
0      dog
1      cat
2      cat
Name: label, dtype: object
,
         dog       cat
0   0.682754  0.317246
1   0.195782  0.804218
2   0.372283  0.627717
否则,仅包含预测概率,例如:
         dog       cat
0   0.682754  0.317246
1   0.195782  0.804218
2   0.372283  0.627717
获取 CloudPredictor 信息#
获取 CloudPredictor 的一般信息:
cloud_predictor.info()
它将输出一个类似于此的字典:
{
    'local_output_path': '/home/ubuntu/XXX/demo/AutogluonCloudPredictor/ag-20221111_174928',
    'cloud_output_path': 's3://XXX/tabular-demo',
    'fit_job': {
        'name': 'ag-cloudpredictor-1668188968-e5c3',
        'status': 'Completed',
        'framework_version': '0.6.1',
        'artifact_path': 's3://XXX/tabular-demo/model/ag-cloudpredictor-1668188968-e5c3/output/model.tar.gz'
    },
    'recent_transform_job': {
        'name': 'ag-cloudpredictor-1668189393-e95c',
        'status': 'Completed',
        'result_path': 's3://XXX/tabular-demo/batch_transform/2022-11-11-17-56-33-991/results/test.csv.out'
    },
    'transform_jobs': ['ag-cloudpredictor-1668189393-e95c'],
    'endpoint': 'ag-cloudpredictor-1668189208-d23b'
}
将 CloudPredictor 转换为本地 AutoGluon 预测器#
只要您在本地安装了相同版本的 AutoGluon,就可以轻松地将您在 SageMaker 上训练的 CloudPredictor 转换为本地机器上的预测器。
local_predictor = cloud_predictor.to_local_predictor(
    save_path="PATH"  # If not specified, CloudPredictor will create one.
)  # local_predictor would be a TabularPredictor
to_local_predictor() 会在底层下载 tarball,将其解压到本地磁盘,并加载为相应的 AutoGluon 预测器。